Amber Helix Guide and Walkthrough
This strategy guide to Amber Helix’s challenge modes is written under the guise of fanfiction. No information within should be assumed as canon to the series. This guide is written to avoid spoilers while still speculating between the lines on the story.

>> Intercepted communication: Internal Memo #E7Eirfz79zcJjp7.
>> No identified sender or point of origin. Encryption would suggest defense departments, but the encryption is outdated. Possibility: the encryption was meant to be broken.
Greetings pilots.
Certain profiteers have uncovered a possible threat to security and morale; if you’re reading this, you know what and where.
No official encouragement of engagement will be made and no reward will be offered publicly. We wish this matter to be resolved quietly. Use the information gathered within this file by your own means to your own ends.
General Advice:
- Retain and develop a wide array of salvaged optional equipment. One single fighter configuration is unlikely to succeed. Trial and error may be required to clear a sector.
- Certain ships have been designed to meet threats like this, and are available for purchase by private citizens with military experience.
- Maintain your craft. Install updates and upgrades as they become available. Upgrading maneuverability and firepower are the top early priorities.
- Some sectors have been scouted, and plans of attack have been suggested along the following color coded delineations:
- Red: This sector is rife with capital ships. The only advised strategy is heavy offense; if your firepower does not exceed the rate of reinforcement arrivals, failure is inevitable. Some sectors have recommended damage ratings; check these against your rating by the formula of projectile*damage*X2damage. [Note that firing speed is assumed to be at the nominal upper limit.]
- Yellow: “Small” armament fire saturation warning. Heavy armor strongly recommended, since armor repair routines on modern attack craft do not drain power from weapon systems. Regeneration options will also be indispensable in these sectors.
- Green: This sector is an artery for fungible items including fuel- and ammunition-grade isotopes. Salvage equipment may confer the best chance for battlefield domination. Most green sectors are also primary targets for acquiring new tactical equipment options.
- Any sector suspected containing a dreadnaught or other supercapital ship should be considered “orange,” but individual strategy development is likely to be necessary.
- No-Goal Fly-Bys, or “Endless” Missions, are extremely dangerous. Experienced fighter pilots may be able to use them to their advantage for combat experience and salvage.
- Salvaging rare “gold” drone mutations will greatly increase your combat potential.
On Piloting:
- Modern fighter ships’ factory settings are not advised for novice or rusty pilots, and some veteran fliers also consider these software defaults to be difficult to use with the sluggish factory-installed hardware. It’s recommended to try manual maneuvering by the W.A.S.D. control system until your ship’s thrusters are sufficiently powerful for effective neural linkup through the Cursor software.
- Similarly, the autofire option can be more of a hindrance to ships with long weapon recharge times. It’s advised that pilots focus on accurate, manual bursts until they have powerful rapid fire options for area saturation.
- Momentum compensation is advised only while leading a heavily armored target; this can lead to rapid switching between preserved momentum firing and compensated firing. This skill is worth practice. Again, upgrading your maneuverability is a top priority. The tactical difference in momentum preserved fire will become significant.
- Note that your ship will not autopilot out of a sector while any useful salvage is in your area.
Items of Interest

Rapid Fire
A drone’s potent, intact, disposable fission battery, which can be brought to critical mass and used to double plasma cannon firing rates for a short period. Successful recovery of these batteries is a mission-critical objective. 
Spread Fire
Although most fighters have automated flak patterns to use against evasive targets, the coolant which allows plasma cannon motion can be rapidly depleted. Recover these supplemental coolant tanks to restore flak pattern firing.

Invincibility Shield
These rare active armor units are designed to protect long-range drone missiles by firing tiny hydrogen annihilation pellets to disperse or destroy incoming projectiles. Small and adaptable crafts may be able to use these shields for a short time.
 Beam Weapon
Likely designed as a countermeasure-proof weapon, this short-lived and little-studied exotic power source is thought to emit a directed muon beam which can penetrate through kilometers of armor. These weapons are short-lived due to gamma radiation from the power source, which must be contained, shielded, and truncated before permanent damage is done to living tissue. Despite the energy losses from the weakly interacting projectiles, a single one of these weapons can devastate a clustered force.
Drone Bestiary
Note that most drones have multiple design iterations. Only one drone from each classification will be pictured.
 Cell
Cell
Cells are the grunts of the drone army, which number in legions of legions. Analysis suggests they were one of the first functional units developed for the army, and they continue to fill a vital role in its force, as their tight formations fire plasma bolt volleys capable of deterring or annihilating fighter-class ships. They should be given a high targeting priority.
As pets: A single Cell provides little to supplement modern technology. However, the biological components in any drone are subject to rare, superior mutations, so there is a chance a useful Cell-class drone could be recovered.

Wasp
Wasp interceptors patrol their operation areas in dense swarms to engage freighters, bombers, and other lightly armored or pinpoint-attack vessels. They are primarily a tool of disruption, and fare better against supply routes than heavy fighters, but when complemented by carrier support, wasp drones become a serious threat against any incursion. Note that spread pattern upgrades sharply increase performance against Wasp fleets.
As pets: See Cells.

Blade
The Blade is a reconnaissance specialist drone programmed to make multiple flybys for threat assessment and neutralization. Its compact plasma cannons aid in its missions by discouraging attackers and harassing opposed forces. As pets: The Blade’s survival programs may assist with evasion and intelligence gathering capacities.

Lance
“Shells” composed of tens of thousands of these drones orbit important tactical positions and materiel stockpiles, forming a proactive minefield. Their miniature antimatter warheads are designed to puncture the hulls of large warships without disrupting drone communications through heavy EM pulsing.
As pets: Lances have much to offer you in spare parts, frequently providing powerful raw materials for weapons and propulsion systems.

Hunter
A more expensive weapon than Cells and Wasps, Hunter teams are dispatched to meet more persistent threats. Their unparalleled agility allows them to adopt spiraling patterns around their target, after which it is a very short matter of time before weaknesses in their prey’s maneuverability or armor will be exposed and catastrophically exploited. Hunters should be given top targeting priority under almost any circumstances.
As pets: Hunters’ agility and firepower technology could be useful.

Wall
Wall emplacements are versatile armored husks equipped with an automatic plasma cannon. They can be fitted for use with beam weapons, homing mines, turrets, and so on.
As pets: Walls are frequently used as repair and upgrade stations, and this technology is easily subject to repurposing for hull plating adjustments, shield adaption, and on-the-fly repair routines.

Tower
Tower units are stationary emplacements which may be mounted on platforms for fire support. As Pets: Thanks to the redundant systems which keep them operational even as their platform is under bombardment, Towers can be modified to provide regenerative processing. Unfortunately, they do not usually contain their own battery arrays or reaction mass containment; reworked Towers are unlikely to contribute to your firepower.

Turret
With their heavy beam weapons, Turrets fill the vital role of fire support and platform defense. Flying deep into a heavily Turreted platform is not advised. They are also possibly the most versatile drone unit; they can be rapidly integrated with maneuvering thrusters and heavy plating for a variety of threat responses. As Pets: Turrets provide much-needed projectile upgrades, an important stepping stone for adaptable ships using factory issue hardware.

Star
A long range light turret which employs beam weaponry to provide suppressive fire against fighter squadrons. The Star’s economic design allows multitudes of them to be placed as a screen against large invasions. As Pets: The Star’s efficient defenses may be turned to your advantage.

Bomber
Drone Bombers sweep into flight vectors launching volleys of homing mines. Their high offensive capacity along with their thin shielding makes them a very high targeting priority. As Pets: Bombers’ stockpiled rare isotopes make them a target for salvage operations.

Freighter
The pack mule of the drone army; with their efficient engines, the Freighters carry the army’s critical infrastructure on their backs. Everything from fusile isotopes to conduction rails to latticed hyperdiamond-carbon nanotube hull joint plating can be found within them, and, most importantly, they are known to transport the schematics and embryos for a wide range of drone ships. Naturally, they should be incapacitated and/or plundered whenever possible. As Pets: Drone Freighters are not merely transport ships; many contain miniature analysis engines and synthesis factories which can easily be repurposed to provide boosts in salvage and tactical assessment.

Carrier
The “Wasp Nest” Carrier is likely the drone army’s earliest capital vessel. Although Carrier production seems limited due to incompatibilities with the hull reinforcements seen in newer units, the carriers remain effective in service. Their ability to quickly overwhelm small detachments with mass-produced drones should not be underestimated. Heavy weapons and rapid pinpoint strikes are recommended; very high targeting priority. As Pets: Carriers’ production facilities may improve your salvage and tactical analysis processes.

Sapper
Sapper fleets manufacture and place spiraling minefields ahead of capital vessels. They pose little difficulty for smaller and more agile fighters, and should be given medium targeting priority. Note that allowing a large Sapper fleet to maneuver into your path is likely to prove fatal. As Pets: The Sapper can be tamed to lend its significant material gathering assessments.

Worm
Worm drones are large linked structures which rely on their medium-heavy armor and fighter support to physically contain and neutralize threats. Heavy weapons are recommended against Worm sectors, but targeting priority is moderate. As with Colonies, locating and employing beam weapons produces the most successful outcomes against their composite structures. As Pets: Worm drones can provide their thick armor.

Colony
Colony capital ships resemble fractal iterations on the Cell design with good reason; they are production facilities which seek raw materials on stony asteroids in systems on the edges of the Hadal Void, then return to process their food in safety before undergoing a process of cybernetic partial meiosis. It has been postulated that as few as four cells, split off from their unit, could eventually form a Colony ship even from interstellar dust, generating the seed of a new drone fleet. Colonies should be given moderate to high targeting priority, lest they reach an uncontrollable density in an area, and beam weapons should be used if at all possible. As Pets: Colony cores often contain the foundations for potent offensive systems.
Fortress
Fortresses are the primary heavy support ships of the drone army. When they aren’t firing their massive plasma batteries on opposed battleships, Fortresses can be quickly configured to provide maintenance and repair on smaller drones. Their preferred method of attack is saturation bombing; it’s advised to concentrate fire on one or two Fortresses at a time. Mark your targets: their formation scrambling may cause fire to be spread over all Fortresses in the vicinity, allowing them time for overwhelming reinforcements to arrive. As Pets: Fortress cores frequently provide the latest and greatest in combat longevity.

Spire
Late reports have focused on this capital gunship. It is likely a prototype in the middle stages of implementation. The Spire is both highly maneuverable and well armored, and it carries the most notable armament among the drone units. Preliminary studies of the few recovered wreckages suggest labyrinthine intestinal masses of spooled and miniaturized particle accelerators within the Spire’s hull; it is possible that the Spire’s primary beam weapon is a gamma ray laser, or even a relativistically-accelerated microscopic singularity stream, within an optical targeting laser. As Pets: It’s considered unlikely that the Spire’s self-destruct failsafes could be disabled in a combat scenario, but the propulsion and weapons technology may be worth recovery attempts.
?
Fighter, Observer, and Guardian These are command cores from supercapital ships, and boost attack/thrust, intelligence/salvage, and armor/shield/regeneration potentials, respectively.
Walkthrough
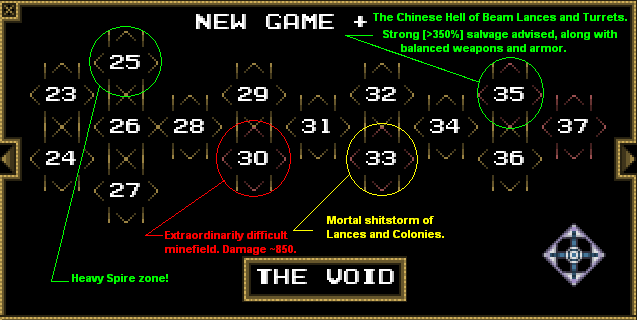
This walkthrough was created in New Game +, so any statistics [such as a recommended firepower rating] pertain only to that mode. Also note that this guide may be outdated, as drone regiments are quite mobile.
The color-coded circles around some of the more challenging zones suggest what modifications you should specialize in to complete the sector more easily; green for high salvage, red for high firepower, yellow for high armor [and regeneration; shields are a tertiary priority]. See the General Advice section at the top of this guide for more information.
Speed and damage are always important. A decent salvage score is always helpful. Armor is an option, but destroying the enemy before they can get a shot off is always better.
Note that Sector 13 is an excellent place to hunt for rare drone classes such as Walls. You got a gold speed drone on the previous playthrough, right? If not, try culling Lance shells. The Heart is a good place to find them, but you won’t be getting back there without that gold speed upgrade.
Grinding may be required. Recovering a gold attack drone that receives +2 from damage upgrades is essential [and more than one, with +1 Projectile, provides a more realistic chance for success]. Finding them will not be easy; Sector 18 of The Rim is one place to look.
The final few stages in The Void should be attempted with damage ratings close to 1000.
Note that the dreadnaught stationed in Sector 37 does not have support ships; salvage will not help you there [although it certainly will in the greater Sector 37 area], and strong armor is advised.


